What Is Surya Namaskaram?
Surya Namaskaram, also known as Surya Namaskar or Sun Salutation, is one of the most recognised and widely practised sequences in yoga. The word “Surya” means Sun, while “Namaskar” means salutation or respectful greeting. Traditionally associated with offering gratitude to the Sun, the practice is also widely used today as a flowing sequence of yoga postures coordinated with breathing.
A commonly taught version consists of 12 positions performed in sequence. Different yoga traditions may teach small variations in names, alignment and transitions, but the essential idea remains the same: movement and breath are linked together. The practice combines forward bends, backward extensions, lunges and weight-bearing positions, engaging several parts of the body in one routine.
Note: Always consult a certified yoga teacher before starting Surya Namaskaram on your own, especially if you have any medical conditions or injuries.
What Are the Benefits of Surya Namaskaram?
1. May improve flexibility: The sequence includes forward folds, lunges and gentle spinal extensions that may gradually improve range of movement.
2. Helps build strength: Several positions require controlled muscular engagement through the arms, shoulders, core and legs.
3. Encourages full-body movement: The sequence moves the shoulders, spine, hips, legs and arms, making it a convenient way to include structured movement in the day.
4. Connects movement with breathing: Coordinating inhalation and exhalation with movement encourages greater awareness of the breath and body.
5. May support mental well-being: A mindful practice can create a pause from daily distractions and help practitioners focus on the present moment.
6. Can feel energising: Because it is a flowing physical sequence, many people enjoy practising it as part of a morning movement routine.
Who Can Practise Surya Namaskaram?
Surya Namaskaram can be adapted for different levels of experience, including beginners. New practitioners should ideally learn the individual positions slowly before attempting a continuous sequence.
It may be suitable for adults who want to introduce regular movement into their routine, gradually improve flexibility, build strength and body awareness, or combine mindful breathing with movement.
However, not everyone should practise the standard sequence in the same way. People with significant injuries, recent surgery, cardiovascular concerns, spinal or joint problems, or other medical conditions should seek appropriate professional guidance. Pregnancy may also require modifications. Stop the practice if it causes pain, dizziness or significant discomfort.
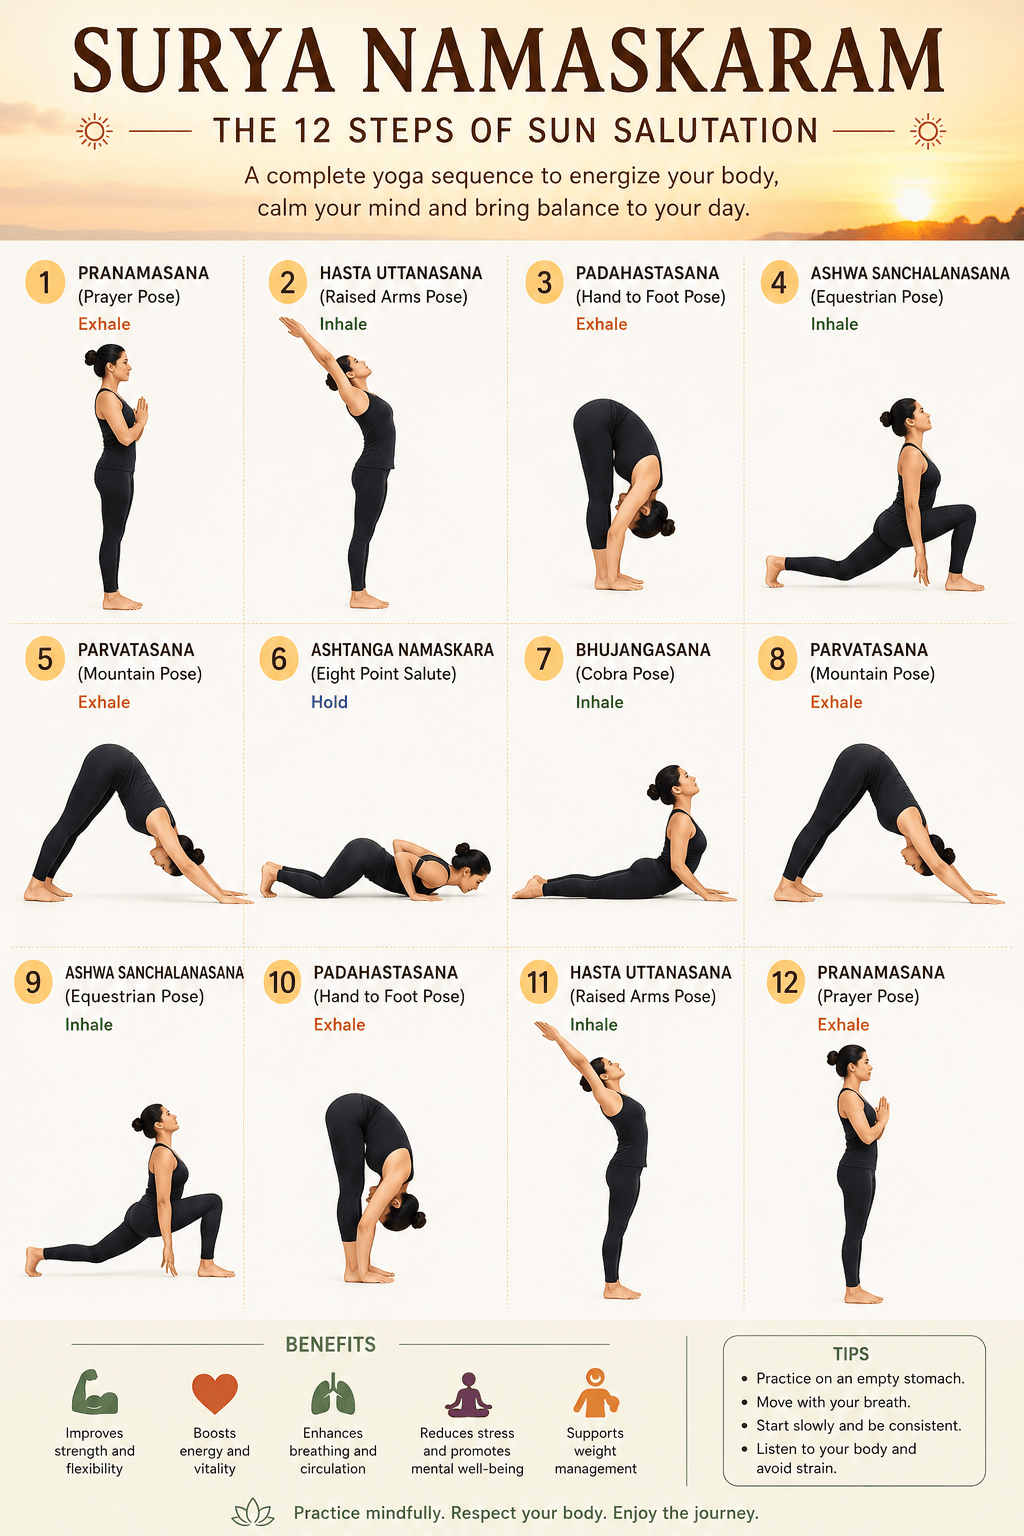
The 12 Steps of Surya Namaskaram
1. Pranamasana – Prayer Pose
Stand upright and bring your palms together in front of your chest. Take a moment to steady your breathing and bring your awareness to the present moment.
2. Hastottanasana – Raised Arms Pose
Inhale and raise your arms overhead. Lengthen upward and add only a gentle backward extension if it feels comfortable.
3. Padahastasana – Hand-to-Foot Pose
Exhale and fold forward from the hips. Bring your hands towards the floor or as far as your flexibility comfortably allows. Do not force the stretch.
4. Ashwa Sanchalanasana – Equestrian Pose
Inhale and step one leg back into a lunge. Keep the front foot stable and move into a comfortable range.
5. Parvatasana – Mountain Pose
Exhale and take the other leg back, lifting the hips to form an inverted-V shape. Bend the knees slightly if that makes the position more comfortable.
6. Ashtanga Namaskara – Eight-Point Salute
Lower the body towards the floor with control. Beginners should learn this transition carefully and avoid unnecessary strain.
7. Bhujangasana – Cobra Pose
Inhale and gently lift the chest. Keep the shoulders relaxed and avoid forcing a deep backward bend.
8. Parvatasana – Mountain Pose
Exhale and return to the inverted-V position. Allow the spine to lengthen and breathe steadily.
9. Ashwa Sanchalanasana – Equestrian Pose
Inhale and bring the opposite leg forward into a lunge, balancing the sequence on both sides.
10. Padahastasana – Hand-to-Foot Pose
Exhale and bring the back foot forward into a comfortable standing forward fold.
11. Hastottanasana – Raised Arms Pose
Inhale and rise gradually, lifting the arms overhead. Add only a comfortable backward stretch.
12. Pranamasana – Prayer Pose
Return to an upright standing position and bring your palms together at your chest. Pause and notice your breathing before beginning another round.
How Many Rounds Should You Do?
There is no single number that is right for everyone. Beginners can focus first on learning one slow, controlled round. As confidence, mobility and fitness improve, the number of rounds can be increased gradually according to comfort and appropriate guidance.
Doing more is not necessarily better. Good technique, controlled breathing and respecting your body’s limits are more important than reaching a particular number.
A Final Thought
Surya Namaskaram brings together movement, breath and awareness in one flowing practice. You do not need to be extremely flexible or perform every posture perfectly to begin. Start where you are, learn the correct technique and respect your body’s limits.
With regular and mindful practice, Surya Namaskaram can become a meaningful part of a daily routine—a few moments to stretch, breathe, move and reconnect with yourself.
Yoga is not about forcing your body into a pose. It is about learning to work with your body, one breath and one movement at a time.


Leave a Reply